Android App Links will not work without a correctly configured assetlinks.json file. This file is what Android uses to confirm your app is authorized to handle URLs at your domain. Without it, links open in the browser instead of your app, even if everything else in your manifest is configured correctly.
This guide covers what assetlinks.json contains, how to extract the SHA-256 fingerprint from your signing keystore, how to use Google's Statement List Generator tool, how to handle multiple signing certificates, and how to validate your setup before and after deployment.
What assetlinks.json Does
The assetlinks.json file declares an association between a website and an Android app. It answers one question: does this website authorize this app to handle its URLs?
Android fetches the file from a fixed path on your domain: https://yourdomain.com/.well-known/assetlinks.json. The file must be served over HTTPS, with a valid certificate, and without redirects. Android will not follow redirects when fetching this file.
The verification check happens at app install time. If verification succeeds, Android registers your app as a verified handler for the declared URLs. If it fails (because the file is missing, returns an error, or the fingerprint doesn't match), App Links verification fails and links fall back to browser behavior.
The Android App Links verification documentation describes the full verification process, including retry behavior and how to check verification status on a device.
The File Structure
A minimal assetlinks.json file looks like this:
[
  {
    "relation": ["delegate_permission/common.handle_all_urls"],
    "target": {
      "namespace": "android_app",
      "package_name": "com.yourcompany.yourapp",
      "sha256_cert_fingerprints": [
        "AA:BB:CC:DD:EE:FF:00:11:22:33:44:55:66:77:88:99:AA:BB:CC:DD:EE:FF:00:11:22:33:44:55:66:77:88:99"
      ]
    }
  }
]
The file is a JSON array. Each object in the array is a "statement" that declares a relationship between the site and an app. For deep linking, the relation is always delegate_permission/common.handle_all_urls.
The three fields in the target object:
namespace: alwaysandroid_appfor Android App Linkspackage_name: your app's application ID, exactly as declared in yourbuild.gradlefilesha256_cert_fingerprints: an array of SHA-256 fingerprints of the signing certificates that can sign a valid build of your app
The fingerprint format is 32 pairs of uppercase hex characters separated by colons. A common mistake is using the wrong separator (dashes instead of colons) or lowercase hex. Both will cause verification to fail.
Extracting the SHA-256 Fingerprint from Your Keystore
Android apps are signed with a Java KeyStore (JKS or PKCS12) file. You need the SHA-256 fingerprint of the certificate stored in that keystore.
Use the keytool command, which ships with the Java Development Kit:
keytool -list -v \
  -keystore /path/to/your.keystore \
  -alias your_key_alias
You will be prompted for the keystore password. The output includes fingerprints in multiple formats. You want the SHA256 line:
Certificate fingerprints:
     MD5:  ...
     SHA1: ...
     SHA256: AA:BB:CC:DD:EE:FF:...
Copy the SHA256 value exactly, including the colons.
Debug Keystore
During development, Android signs your app with a debug keystore. Its location depends on your OS:
- macOS/Linux:
~/.android/debug.keystore - Windows:
%USERPROFILE%\.android\debug.keystore
The debug keystore uses standard credentials:
keytool -list -v \
  -keystore ~/.android/debug.keystore \
  -alias androiddebugkey \
  -storepass android \
  -keypass android
Include the debug keystore's SHA-256 fingerprint in your assetlinks.json during development so you can test App Links without a production-signed build.
Release Keystore
Your release keystore is the file you use to sign APKs and App Bundles for the Play Store. Extract its fingerprint the same way, substituting your actual keystore path, alias, and password.
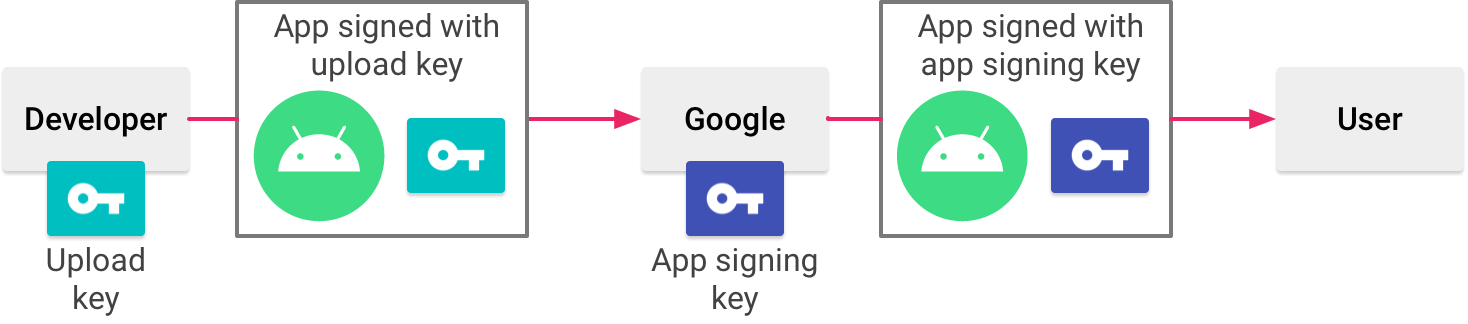
If you use Google Play App Signing (which Google strongly recommends), the certificate that actually signs your app on the Play Store is managed by Google, not your local keystore. The fingerprint in your assetlinks.json must match the Play-managed certificate, not your upload certificate.
To get the Play-managed certificate fingerprint:
- Open the Google Play Console
- Select your app
- Go to Release > Setup > App signing
- Find the "App signing key certificate" section
- Copy the SHA-256 certificate fingerprint listed there
This fingerprint is different from your upload key fingerprint. Using the upload key fingerprint in assetlinks.json when Play App Signing is enabled is a common mistake that causes verification to fail on production builds.
Using Google's Statement List Generator
Google provides a web tool for generating assetlinks.json without writing JSON by hand: the Statement List Generator.
Source: Android Developer Documentation
The tool asks for:
- Your domain (e.g.,
yourdomain.com) - Your app's package name
- Your app's SHA-256 fingerprint
It generates the JSON and optionally verifies the file if you've already hosted it. This is useful for a quick sanity check on a new setup, but it does not replace extracting the fingerprint from your actual keystore (the tool takes the fingerprint as input, so you still need to get it from keytool or the Play Console).
Handling Multiple Signing Certificates
The sha256_cert_fingerprints field is an array. You can include multiple fingerprints, and App Links verification will succeed if the installed app is signed with any of them. This is important for several common scenarios:
Debug and release in parallel. Include both your debug keystore fingerprint and your release keystore fingerprint so you can test App Links on debug builds while production users on release builds also benefit from verification.
Play App Signing plus upload key. Include both the Play-managed signing certificate and your upload certificate. Apps installed via the Play Store will be signed with the Play-managed key; sideloaded or internal test builds might be signed with your upload key.
Certificate rotation. If you rotate your signing key, include both the old and new fingerprints during the transition period. Remove the old one once you're confident no users are on the old signed build.
[
  {
    "relation": ["delegate_permission/common.handle_all_urls"],
    "target": {
      "namespace": "android_app",
      "package_name": "com.yourcompany.yourapp",
      "sha256_cert_fingerprints": [
        "AA:BB:CC:...(debug keystore fingerprint)...",
        "11:22:33:...(Play-managed signing certificate fingerprint)...",
        "44:55:66:...(upload key fingerprint, if needed)..."
      ]
    }
  }
]
Multiple Apps on the Same Domain
If you have multiple apps that should handle URLs at the same domain (uncommon but valid), include a statement object for each:
[
  {
    "relation": ["delegate_permission/common.handle_all_urls"],
    "target": {
      "namespace": "android_app",
      "package_name": "com.yourcompany.mainapp",
      "sha256_cert_fingerprints": ["AA:BB:CC:..."]
    }
  },
  {
    "relation": ["delegate_permission/common.handle_all_urls"],
    "target": {
      "namespace": "android_app",
      "package_name": "com.yourcompany.otherapp",
      "sha256_cert_fingerprints": ["DD:EE:FF:..."]
    }
  }
]
Each app's AndroidManifest.xml will declare which paths it handles through its intent filters. The domain association in assetlinks.json authorizes both apps to handle URLs at the domain, and path specificity in the manifest determines which app opens which URLs.
Hosting Requirements
The file must be served at exactly this path: /.well-known/assetlinks.json
Specific requirements from the Android documentation:
- Served over HTTPS with a valid, trusted TLS certificate
- No redirects. Android does not follow HTTP redirects when fetching this file
- Content-Type header should be
application/json - HTTP 200 response code (not 3xx, not 4xx)
- Accessible without authentication (no basic auth, no login walls)
- Accessible to Google's servers (not blocked by IP allowlists or firewall rules)
Caching
Android caches the assetlinks.json file. Changes to the file do not take effect immediately on already-installed apps. Re-verification happens at system intervals or when the app is reinstalled.
If you push an update to assetlinks.json, do not expect App Links behavior to change on devices that have already verified. Testing certificate changes requires uninstalling and reinstalling the app.
There is no way to set the cache duration from the server side for Android's internal verification cache. Do not set a Cache-Control: no-cache header expecting it to force re-verification; the Android system ignores this for its own verification fetches.
Validating Your Setup
Several tools can check your assetlinks.json before and after deployment.
adb verification check. After installing your app on a test device, run:
adb shell pm get-app-links com.yourcompany.yourapp
The output shows the verification status per domain. A verified status means App Links is working. none or failed means something is wrong.
Google's Digital Asset Links API. You can query Google's verification endpoint directly to see whether Google can successfully verify your association:
https://digitalassetlinks.googleapis.com/v1/statements:list?source.web.site=https://yourdomain.com&relation=delegate_permission/common.handle_all_urls
This returns a list of all statements Google finds for your domain. If the response is empty or missing your app, Google cannot verify the association.
Manual HTTP check. Fetch the file with curl to confirm it is reachable without redirects:
curl -I https://yourdomain.com/.well-known/assetlinks.json
Look for HTTP 200, no Location headers (which would indicate a redirect), and a JSON content type. Then fetch the content itself:
curl https://yourdomain.com/.well-known/assetlinks.json
Confirm the package name and fingerprints in the output match what you expect.
Statement List Generator validation. Enter your domain into Google's Statement List Generator tool and use the verification feature to confirm Google can read your file.
Common Mistakes
Wrong fingerprint format. The SHA-256 must use colons as separators and uppercase hex. Dashes, spaces, or lowercase hex will not match.
Upload key vs. Play-managed key. As noted above, these are different. Use the fingerprint from the Play Console's App Signing page for production.
File served with redirects. Many web servers redirect http:// to https://. If your server also redirects /.well-known/assetlinks.json to a different path, verification will fail. Check that the exact path returns 200 over HTTPS.
Returning 404 for empty directories. Some web servers return 404 for requests to the /.well-known/ directory if the directory does not physically exist on disk. Create the directory and place the file there, or configure a server-side route to serve the file.
Incorrect package name. The package_name must exactly match the applicationId in your app's build.gradle. A typo here will cause every verification attempt to fail silently.
For a complete walkthrough of how assetlinks.json fits into the overall Android App Links setup, see the Android App Links complete guide. For how to configure your manifest to declare which paths your app handles, see the Android manifest deep link configuration guide.
Tolinku's App Links documentation covers how to connect your verified App Links setup to the platform's routing, analytics, and fallback page features.
Get deep linking tips in your inbox
One email per week. No spam.