Deep links generate events. Someone clicks a link, opens your app, completes a purchase, or refers a friend. Each of those moments carries data you can act on. The problem is that most teams treat deep linking as a one-way system: you create a link, someone clicks it, and the app opens. That is where the story ends.
Webhooks change the story. They turn deep linking from a one-directional routing mechanism into a connected system that feeds data into your CRM, triggers Slack alerts, fires off emails, and populates your analytics warehouse. Instead of polling an API every few minutes to check whether something happened, your server gets notified the moment it does.
This article covers how to design, build, and scale webhook integrations for deep linking. We will look at the event types worth tracking, walk through code for building and securing webhook receivers, explore common integration patterns, and discuss production-grade error handling.
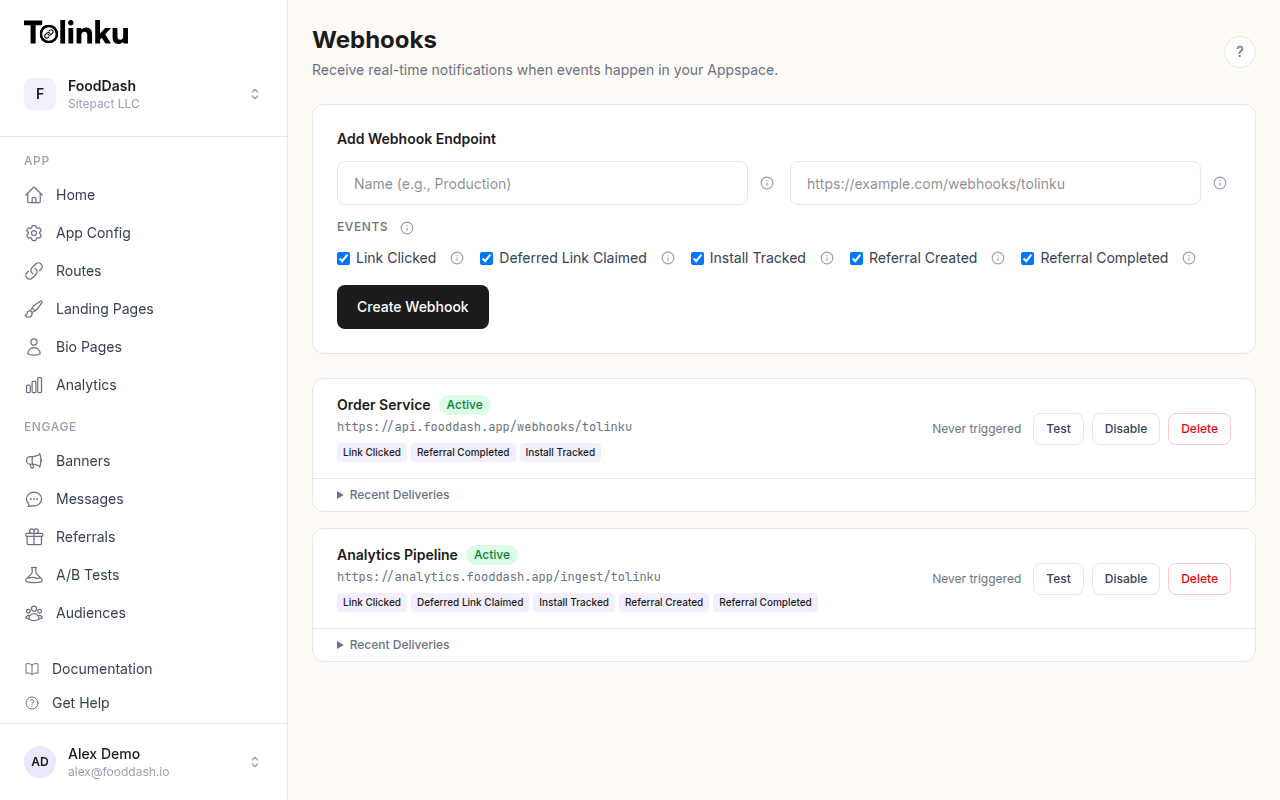 The webhooks page with create form, webhook list, and delivery log.
What Are Webhooks?
A webhook is an HTTP callback. When a specific event occurs, the source system sends an HTTP POST request to a URL you have registered. Your server receives the request, processes the payload, and responds with a status code.
For a step-by-step walkthrough, see our webhook setup guide. The concept is simple, but it is useful to contrast it with the alternative. Without webhooks, you would need to poll an API repeatedly to discover new events. Polling wastes bandwidth when nothing has changed and introduces latency when something has. If you poll every 60 seconds, your response time to a new event is somewhere between 0 and 60 seconds. With webhooks, your response time is effectively zero.
Webhooks follow an event-driven architecture pattern. The source system (your deep linking platform) acts as the producer. Your server acts as the consumer. The contract between them is a URL, a payload format, and an authentication mechanism.
The Webhook.site project is a useful tool for inspecting webhook payloads during development. For the underlying specification, the Standard Webhooks initiative (backed by Svix) is working to formalize conventions around payload structure, signatures, and retry behavior.
Deep Link Events Worth Tracking
Not every event is equally valuable. Here are the ones that matter most for deep linking workflows:
Link clicked. A user tapped or clicked a deep link. This is your most frequent event and the foundation for click analytics. The payload includes the link URL, referrer, user agent, IP-derived location, and any campaign parameters attached to the link.
App opened. The deep link resolved and the app launched. This confirms the link actually worked. The payload includes the route that was matched, the platform (iOS or Android), and any contextual data passed through the link.
Deferred install completed. A user clicked a deep link, did not have the app installed, went to the app store, installed the app, and then opened it. The deep linking platform matched this user back to the original click. This is one of the most valuable events because it represents a new user acquisition.
Conversion. The user completed a target action after arriving via a deep link. This could be a purchase, a signup, a subscription, or any custom event you define. Conversion events let you measure the ROI of specific campaigns and channels.
Referral completed. A referred user installed the app and met whatever criteria you define as a completed referral. This event is critical for referral programs because it triggers reward fulfillment.
Each of these events can drive different automation workflows. For a full list of available events and their payloads, see webhook event types. A click event might update a campaign dashboard. An install event might trigger a welcome email sequence. A conversion event might sync revenue data back to your ad platform.
Webhook Payload Structure
A well-designed webhook payload is self-contained. The receiver should not need to make additional API calls to understand what happened. Here are example payloads for common deep link events:
Link Click Event
{
  "event": "link.clicked",
  "timestamp": "2026-03-04T14:32:08.441Z",
  "data": {
    "link_id": "lnk_8xKp2mVq",
    "url": "https://app.example.com/product/42",
    "campaign": "spring-sale",
    "channel": "email",
    "referrer": "https://mail.google.com/",
    "user_agent": "Mozilla/5.0 (iPhone; CPU iPhone OS 19_3 like Mac OS X)",
    "ip_country": "US",
    "ip_region": "CA",
    "platform": "ios"
  }
}
App Open Event
{
  "event": "link.opened",
  "timestamp": "2026-03-04T14:32:09.112Z",
  "data": {
    "link_id": "lnk_8xKp2mVq",
    "route": "/product/:id",
    "route_params": {
      "id": "42"
    },
    "platform": "ios",
    "app_version": "3.2.1",
    "is_deferred": false
  }
}
Deferred Install Event
{
  "event": "link.deferred_install",
  "timestamp": "2026-03-04T14:35:22.887Z",
  "data": {
    "link_id": "lnk_8xKp2mVq",
    "original_click_at": "2026-03-04T14:32:08.441Z",
    "platform": "ios",
    "campaign": "spring-sale",
    "channel": "email",
    "match_method": "fingerprint",
    "match_confidence": 0.92
  }
}
The event field tells you what happened. The timestamp tells you when. The data object contains everything specific to that event type. This structure is predictable and easy to route in your receiver code.
Building a Webhook Receiver
A webhook receiver is just an HTTP endpoint that accepts POST requests. Here is a basic implementation in Node.js with Express:
Node.js / Express
const express = require("express");
const app = express();

app.use(express.json());

app.post("/webhooks/deeplinks", (req, res) => {
  const { event, timestamp, data } = req.body;

  console.log(`Received event: ${event} at ${timestamp}`);

  switch (event) {
    case "link.clicked":
      handleLinkClick(data);
      break;
    case "link.opened":
      handleAppOpen(data);
      break;
    case "link.deferred_install":
      handleDeferredInstall(data);
      break;
    case "link.conversion":
      handleConversion(data);
      break;
    default:
      console.log(`Unhandled event type: ${event}`);
  }

  // Respond quickly with 200 to acknowledge receipt
  res.status(200).json({ received: true });
});

function handleLinkClick(data) {
  // Update click analytics in your database
  db.query(
    "INSERT INTO click_events (link_id, campaign, channel, country, platform, clicked_at) VALUES (?, ?, ?, ?, ?, NOW())",
    [data.link_id, data.campaign, data.channel, data.ip_country, data.platform]
  );
}

function handleDeferredInstall(data) {
  // Trigger a welcome email for new installs from campaigns
  if (data.campaign) {
    emailService.sendWelcomeEmail({
      campaign: data.campaign,
      channel: data.channel,
      installedAt: new Date(),
    });
  }
}

app.listen(3000, () => {
  console.log("Webhook receiver running on port 3000");
});
Python / Flask
from flask import Flask, request, jsonify
from datetime import datetime

app = Flask(__name__)

@app.route("/webhooks/deeplinks", methods=["POST"])
def handle_webhook():
    payload = request.get_json()
    event = payload.get("event")
    timestamp = payload.get("timestamp")
    data = payload.get("data", {})

    print(f"Received event: {event} at {timestamp}")

    handlers = {
        "link.clicked": handle_link_click,
        "link.opened": handle_app_open,
        "link.deferred_install": handle_deferred_install,
        "link.conversion": handle_conversion,
    }

    handler = handlers.get(event)
    if handler:
        handler(data)
    else:
        print(f"Unhandled event type: {event}")

    return jsonify({"received": True}), 200

def handle_link_click(data):
    # Log to your analytics system
    analytics.track("Deep Link Click", {
        "link_id": data["link_id"],
        "campaign": data.get("campaign"),
        "channel": data.get("channel"),
        "country": data.get("ip_country"),
    })

def handle_deferred_install(data):
    # Notify your growth team
    slack.post_message(
        channel="#growth",
        text=f"New deferred install from {data.get('campaign', 'unknown')} campaign"
    )

if __name__ == "__main__":
    app.run(port=3000)
Both examples follow the same pattern: parse the payload, route based on event type, process the data, and return a 200 response quickly. The key word there is "quickly." We will discuss why in the error handling section.
Verifying Webhook Signatures
Accepting unverified HTTP requests is a security risk. Anyone who discovers your webhook URL could send fake events to it. Webhook signatures solve this problem.
The standard approach uses HMAC (Hash-based Message Authentication Code). The sender computes a hash of the request body using a shared secret key and includes the hash in a request header. The receiver recomputes the hash using the same secret and compares the two values. If they match, the request is authentic.
Here is how to verify an HMAC-SHA256 signature in Node.js:
const crypto = require("crypto");

function verifyWebhookSignature(req, secret) {
  const signature = req.headers["x-webhook-signature"];
  const timestamp = req.headers["x-webhook-timestamp"];

  if (!signature || !timestamp) {
    return false;
  }

  // Protect against replay attacks: reject requests older than 5 minutes
  const eventTime = parseInt(timestamp, 10);
  const currentTime = Math.floor(Date.now() / 1000);
  if (Math.abs(currentTime - eventTime) > 300) {
    return false;
  }

  // Compute the expected signature
  const payload = `${timestamp}.${JSON.stringify(req.body)}`;
  const expectedSignature = crypto
    .createHmac("sha256", secret)
    .update(payload)
    .digest("hex");

  // Use timing-safe comparison to prevent timing attacks
  return crypto.timingSafeEqual(
    Buffer.from(signature),
    Buffer.from(expectedSignature)
  );
}

// Middleware usage
app.post("/webhooks/deeplinks", (req, res) => {
  if (!verifyWebhookSignature(req, process.env.WEBHOOK_SECRET)) {
    return res.status(401).json({ error: "Invalid signature" });
  }

  // Process the verified event...
  res.status(200).json({ received: true });
});
And in Python:
import hmac
import hashlib
import time
import json

def verify_webhook_signature(request, secret):
    signature = request.headers.get("X-Webhook-Signature")
    timestamp = request.headers.get("X-Webhook-Timestamp")

    if not signature or not timestamp:
        return False

    # Reject requests older than 5 minutes
    event_time = int(timestamp)
    current_time = int(time.time())
    if abs(current_time - event_time) > 300:
        return False

    # Compute expected signature
    payload = f"{timestamp}.{json.dumps(request.get_json(), separators=(',', ':'))}"
    expected = hmac.new(
        secret.encode("utf-8"),
        payload.encode("utf-8"),
        hashlib.sha256
    ).hexdigest()

    return hmac.compare_digest(signature, expected)
For a deeper dive into signature patterns, see webhook security and signing. Three things to notice here:
Timestamp validation. The signature includes a timestamp, and the receiver rejects any request where the timestamp is more than five minutes old. This prevents replay attacks, where an attacker captures a valid webhook request and resends it later.
Timing-safe comparison. Both
crypto.timingSafeEqual(Node.js) andhmac.compare_digest(Python) compare strings in constant time. A naive string comparison (===or==) leaks timing information that could theoretically let an attacker guess the signature byte by byte.Payload construction. The signature covers both the timestamp and the body. This prevents an attacker from reusing a valid signature with a different payload.
For more detail on webhook signing patterns, see the Tolinku webhook signing and verification guide.
Common Integration Patterns
Once your webhook receiver is verified and running, the real value comes from what you do with the events. Here are the patterns we see most often.
CRM Sync
When a user arrives via a deep link and converts, you want that attribution data in your CRM. A webhook handler can update the contact record in HubSpot, Salesforce, or any CRM with an API:
async function handleConversion(data) {
  // Update the contact in your CRM with attribution data
  await hubspotClient.crm.contacts.basicApi.update(data.user_id, {
    properties: {
      last_deep_link_campaign: data.campaign,
      last_deep_link_channel: data.channel,
      deep_link_conversion_date: new Date().toISOString(),
      deep_link_conversion_value: data.revenue,
    },
  });
}
This closes the loop between marketing spend and customer records. Your sales team can see which campaigns drove which customers, without manually tagging anything. For more CRM integration patterns, see webhook CRM integration.
Slack Notifications
Real-time alerts for high-value events keep your team informed without requiring them to check a dashboard:
async function handleDeferredInstall(data) {
  await fetch(process.env.SLACK_WEBHOOK_URL, {
    method: "POST",
    headers: { "Content-Type": "application/json" },
    body: JSON.stringify({
      text: `New install from *${data.campaign}* campaign (${data.channel})\nPlatform: ${data.platform} | Match confidence: ${data.match_confidence}`,
    }),
  });
}
A dedicated
#deep-link-installschannel gives your growth team a live feed of acquisition activity. You can filter notifications to only fire for specific campaigns or high-confidence matches.Analytics Pipeline
For teams running their own analytics infrastructure (ClickHouse, BigQuery, Snowflake, or Redshift), webhooks feed event data directly into the warehouse:
def handle_link_click(data):
    # Insert into ClickHouse for real-time analytics
    clickhouse_client.execute(
        """INSERT INTO deep_link_events
           (event_type, link_id, campaign, channel, country, platform, event_time)
           VALUES""",
        [{
            "event_type": "click",
            "link_id": data["link_id"],
            "campaign": data.get("campaign", ""),
            "channel": data.get("channel", ""),
            "country": data.get("ip_country", ""),
            "platform": data.get("platform", ""),
            "event_time": datetime.utcnow(),
        }]
    )
This gives you full control over your data. You can build custom funnels, attribution models, and reports that match exactly how your business thinks about deep link performance.
Email Triggers
Deferred install events are a natural trigger for onboarding emails. The user just installed your app from a specific campaign, so you know their context:
async function handleDeferredInstall(data) {
  const templateId = getTemplateForCampaign(data.campaign);

  await emailService.send({
    to: data.user_email, // if available via server-side enrichment
    template_id: templateId,
    dynamic_data: {
      campaign_name: data.campaign,
      deep_link_content: data.route_params,
    },
  });
}
A user who installed from a "spring-sale" campaign gets a different welcome email than someone who installed from a referral link. Context-aware onboarding improves activation rates.
Error Handling and Retries
Production webhook integrations need to handle failures gracefully. Networks are unreliable, servers go down, and databases occasionally become unavailable.
Respond First, Process Later
The single most important rule for webhook receivers: return a 200 response as fast as possible, then process the event asynchronously. Most webhook senders have a timeout (typically 5 to 30 seconds). If your receiver does not respond within that window, the sender treats it as a failure and schedules a retry.
app.post("/webhooks/deeplinks", async (req, res) => {
  // Verify signature
  if (!verifyWebhookSignature(req, process.env.WEBHOOK_SECRET)) {
    return res.status(401).json({ error: "Invalid signature" });
  }

  // Acknowledge immediately
  res.status(200).json({ received: true });

  // Process asynchronously (don't await in the request handler)
  processEvent(req.body).catch((err) => {
    console.error("Failed to process webhook event:", err);
    // Queue for retry or send to dead letter queue
    deadLetterQueue.add(req.body);
  });
});
Idempotency
Webhook senders retry failed deliveries. This means your receiver might get the same event more than once. Your processing logic needs to be idempotent, meaning processing the same event twice should not create duplicate records or trigger duplicate side effects.
The simplest approach is to track event IDs:
async function processEvent(payload) {
  const eventId = payload.id;

  // Check if we have already processed this event
  const exists = await db.query(
    "SELECT 1 FROM processed_events WHERE event_id = ?",
    [eventId]
  );

  if (exists) {
    console.log(`Event ${eventId} already processed, skipping`);
    return;
  }

  // Process the event
  await handleEvent(payload);

  // Mark as processed
  await db.query(
    "INSERT INTO processed_events (event_id, processed_at) VALUES (?, NOW())",
    [eventId]
  );
}
For database operations, you can also use upserts (
INSERT ... ON CONFLICT DO UPDATE) to make individual writes naturally idempotent without a separate tracking table.Dead Letter Queues
When an event fails processing after multiple attempts, it should go to a dead letter queue rather than being lost. A dead letter queue is simply a storage location (a database table, an S3 bucket, a Redis list) where failed events sit until someone investigates:
async function processWithRetry(payload, attempts = 0) {
  try {
    await processEvent(payload);
  } catch (err) {
    if (attempts < 3) {
      // Exponential backoff: 1s, 4s, 9s
      const delay = Math.pow(attempts + 1, 2) * 1000;
      setTimeout(() => processWithRetry(payload, attempts + 1), delay);
    } else {
      // Send to dead letter queue after 3 failures
      await db.query(
        "INSERT INTO dead_letter_queue (payload, error, failed_at) VALUES (?, ?, NOW())",
        [JSON.stringify(payload), err.message]
      );
    }
  }
}
Scaling Webhook Processing
At low volume (a few hundred events per day), processing webhooks synchronously in your request handler works fine. At higher volumes (thousands or millions of events per day), you need a queue-based architecture.
Queue-Based Processing
Instead of processing events inline, push them onto a message queue (Redis, RabbitMQ, Amazon SQS, or similar) and process them with dedicated worker processes:
const Queue = require("bull");

const webhookQueue = new Queue("deep-link-webhooks", {
  redis: { host: "localhost", port: 6379 },
});

// Producer: the webhook endpoint
app.post("/webhooks/deeplinks", (req, res) => {
  if (!verifyWebhookSignature(req, process.env.WEBHOOK_SECRET)) {
    return res.status(401).json({ error: "Invalid signature" });
  }

  // Enqueue the event and respond immediately
  webhookQueue.add(req.body);
  res.status(200).json({ received: true });
});

// Consumer: a separate worker process
webhookQueue.process(async (job) => {
  const payload = job.data;

  switch (payload.event) {
    case "link.clicked":
      await handleLinkClick(payload.data);
      break;
    case "link.opened":
      await handleAppOpen(payload.data);
      break;
    case "link.deferred_install":
      await handleDeferredInstall(payload.data);
      break;
    case "link.conversion":
      await handleConversion(payload.data);
      break;
  }
});
This pattern gives you several advantages. The webhook endpoint stays fast because it only validates and enqueues. Worker processes can be scaled independently based on queue depth. Failed jobs get retried automatically by the queue library. And you can add new consumers (for example, a second worker that sends events to your data warehouse) without changing the endpoint code.
Batching
If your downstream systems support batch writes, you can drain the queue in batches rather than one event at a time:
import time

def process_batch():
    while True:
        # Collect events for up to 5 seconds or 100 events
        batch = []
        deadline = time.time() + 5

        while len(batch) < 100 and time.time() < deadline:
            event = queue.get(timeout=1)
            if event:
                batch.append(event)

        if batch:
            # Batch insert into ClickHouse
            clickhouse_client.execute(
                "INSERT INTO deep_link_events VALUES",
                [transform_event(e) for e in batch]
            )
Batch processing reduces the number of database round trips and improves throughput significantly for analytics workloads.
Webhooks with Tolinku
Tolinku supports webhooks as a core feature. Each Appspace can register multiple webhook endpoints, and you can subscribe to specific event types rather than receiving every event.
The setup process is straightforward. In your Appspace dashboard, you provide a URL and select which events you want to receive. Tolinku signs every webhook delivery with an HMAC-SHA256 signature, and includes both the signature and a timestamp in the request headers. The developer webhook guide walks through payload formats and verification code for multiple languages.
For testing, Tolinku provides a delivery log and test tools so you can inspect payloads, replay failed deliveries, and send test events to your endpoint before going live. When creating new endpoints, the step-by-step guide covers configuration options including event filtering and retry behavior.
If you need to pull data rather than receive pushes (for example, to backfill historical events or query link metadata), the Tolinku REST API complements the webhook system. Webhooks and API access work together: use webhooks for real-time event streaming and the API for on-demand queries.
Best Practices
Here is a summary of the patterns that matter most when building webhook integrations for deep linking:
Respond within 5 seconds. Return a 200 status code as soon as you have validated the request. Push heavy processing to a background job or queue. If the sender times out waiting for your response, it will retry, and you will end up processing duplicates.
Always verify signatures. Never skip signature verification, even in development. Use the HMAC-SHA256 approach described above, and always use timing-safe comparison functions. The OWASP Webhook Security Cheat Sheet is a good reference for additional security considerations.
Make processing idempotent. Assume you will receive the same event more than once. Use event IDs to deduplicate, or design your database operations to be naturally idempotent using upserts.
Handle retries gracefully. If your receiver returns a 5xx status code, the sender will retry. This is a feature, not a bug. But it means your code needs to handle duplicate deliveries without side effects. Log failures, use dead letter queues, and set up alerts for persistent failures.
Subscribe selectively. If you only care about conversion events, do not subscribe to click events. Filtering at the source reduces the volume your receiver needs to handle and keeps your processing logic focused.
Monitor delivery health. Track your webhook endpoint's response times and error rates. A slow or failing webhook receiver does not just miss events; it generates retry traffic that compounds the problem. Set up monitoring on both sides: alert when your receiver's error rate spikes, and check the sender's delivery dashboard for failed attempts.
Use HTTPS. Webhook payloads often contain user data, IP addresses, and campaign identifiers. Always use HTTPS for your webhook endpoint. Most webhook senders (including Tolinku) refuse to deliver to plain HTTP URLs in production.
Plan for schema evolution. Webhook payloads change over time. New fields get added, old fields get deprecated. Write your receiver to ignore unknown fields rather than failing on them. This makes your integration forward-compatible.
Conclusion
Webhooks turn deep linking from a silent routing layer into an observable, actionable system. Every click, install, open, and conversion becomes a signal you can feed into your CRM, your analytics warehouse, your notification channels, and your automation workflows.
The implementation is not complex. A basic receiver is a dozen lines of code. Signature verification adds another dozen. The real work is in deciding what to do with the data and building reliable processing pipelines around it.
Start with one integration. Pick the highest-value event for your team (deferred installs are a good starting point) and connect it to the system where your team will actually see it (Slack, your CRM, or your analytics dashboard). Once that is running, expand to more event types and more downstream systems.
Deep links are not just routing. They are a data source. Webhooks are how you tap into it.
Get deep linking tips in your inbox
One email per week. No spam.